About BLOG RIZACKY

sharing knowledge about the blog, computer and internet

Manual Description Here: Ea eam labores imperdiet, apeirian democritum ei nam, doming neglegentur ad vis.

How to Install Meters and Statistics Tracker

Statistics or better known as the sitemeter is a widget to control the number of visitors who visit the blog, aksesosris can you find this one you can login to http://www.sitemeter.com.

Examples are like this
Tracker is also a tool to find out whether the visitors come from search engines, blogs and others from anywhere we can find out.

In many sites the statistics free of charge, as the example above is the site http://www.sitemeter.com.
how to make our statistics are as follows:


First
Please visit the site http://www.sitemeter.com.

Sign Up for select register

after registering click next

button and click Next

Fill in all the table click Next

Fill in the table click Next again

click the Next button
click Next the button again

After the sign up process is complete, you must do veryfikasi, please open the e-mail you have registered before

Open the e-mail that comes from sitemeter.com, in a username and password to login to sitemeter.com

Then sigin with the username and password have been provided through e-mail before

Select the Manager

Select the Style Meter model to choose your site meter

Select the style you like, then click the Select button

Click the HTML Code

Click on any posts Adding
site meter to a Blogger.com Site

copy all the HTML code provided in the paste on Notepad ago

Click Logout to exit the menu of the site

Done

Live enter the code that we can in our blog

Now we enter the code that we are able to in the blog

the steps are as follows:

For a classic template:

Go to your Blog

Click the TEMPLATE

Click Edit HTML

Click Edit (the menu bar on your browser)

Click Find (on this page) ... ⇒ to speed search

Write the word where you want to place the click Find
Copy & paste the code that has been in the store earlier in the notepad, then click the Preview button to see the changes that occur
If you are a match with the earlier changes, click Save Template Changes.

Done

If you want to position the meter site in the middle, add the code to stay ... <center> code site meter ... <!-- center-->


For blogs with new templates:

Go to your Blog

Click the menu layout

Click Page Elements

Click Add a Page Element

Click on the HTML / JavaScript

Write a title on your site meter field on the form is not filled in the title does not do anything

Copy & paste the code on the Site meter field

Click the Save Changes

Click the new element you created earlier, then move to hold the place you want (in drag & drop)

Click the Preview button to see changes in the new do

When you are matched with the earlier changes, click the Save button

Done
Read More...

How to Create Dropdown Menu

How to Create Dropdown Menu
In a post on the blog, the longer its growing all the more accessories plus the full blog page us. Blog page so that we do not look solid at the menu list archives should be made in the form of a dropdown menu next to the seemingly nice and tidy can also save space, because the blog the more long-or post-widget widget to be added. So with the dropdown menu and the page will be a post or sparingly enough. Imagine if our post collected over many years, how much room is needed for the archives. Can-can out of the room for the column archive.

As for how to create a dropdown menu is as follows:

To create this archive Fulldown ie to have two bloggers with a classic template, and a new template.

1. open your blog

2. Click Template

3. In the sidebar of your blog's archives, there's html code as follows:

& <BloggerArchives>


<a href = "<$ BlogArchiveURL $" $ gt ;'><$ BlogArchiveName $> </ a>


</ BloggerArchives>

4. change the code on some html code below:

<select name = "archivemenu"
onchange = "document.location.href = this.options [this.selectedIndex]. value;">


<option selected> - Archives - </ option>


<BloggerArchives>

<option value = "<$ BlogArchiveURL $>"> <$ BlogArchiveName $> </ option>

</ BloggerArchives>


</ select>

5. When finished, click Save Changes. click DONE, and then click republish.

6. Done.

To use your new template:

1. open your blog

2. click Layout

3. Click Elements PAGE, search element (box) that reads Blog Archive

4. Click Edit on the yesteryear Blog Archive

5. In addition to any posts there are some style radio button, select the radio button labeled Menu with Dropdown how it TIK / check

6. Click Save Changes

7. Done
The above is a description of the steps to create a Dropdown menu for the Archive, now make the dropdown menu in which there is a link,

For your copy, please make the HTML code below:

<form> <select name="menu" onchange="window.open(this.options[this.selectedIndex].value,'_blank')"size=1 name=menu> <option value=0 selected> any posts here that akan appear first </ OPTION>

<option value=" content with the page URL sub "> post title </ option> </ select> </ form>

As an example for the Dropdown menu:

<form> <select name="menu" onchange="window.open(this.options[this.selectedIndex].value,'_blank')"size=1 name=menu>

<option> - Column-Blog - </ option>

<option value=" http://kolom-blog.blogspot.com/2009/06/bidvertiser.html "> Bidveriser </ option>

<option value=" http://kolom-blog.blogspot.com/2009/06/cara-pasang-statistik-meter-dan-tracker.html "> SiteMeter and Statistics Tracker </ option>

<option value=" http://kolom-blog.blogspot.com/2009/06/cara-pasang-jam.html "> How to install the hours </ option>

<option value=" http://kolom-blog.blogspot.com/2009/06/cara-menambah-calender.html "> Post Calendar </ option>

<option value=" http://kolom-blog.blogspot.com/2009/06/cara-menambahkan-aksesoris-slide-show.html "> Post slideshow </ option>

</ form>


The result will be like this:
Read More...

Translate widget icon with symbol flag

How to install the widget icon to translate the symbol flag In making a blog or website I need to add Widgets Translate into blog or website, not only for our own nation but a visit of people from all over the world who may also visit our website or blog. For visitors who do not understand the language that we use where they may be able to understand. Therefore Translate Widget is required, while a widget or code can be taken from google translate, the style of the standard we have put in the sidebar widget, which also has been modified by using the icon symbol of a flag State. Widgets translate standard code like this:
 old code
<script src="http://www.gmodules.com/ig/ifr?url=http://www.google.com/ig/modules/translatemypage.xml&up_source_language=id&w=160&h=60&title=&border=&output=js>result like this

new code
<script src="http://www.gmodules.com/ig/ifr?url=http://www.google.com/cse/api/015110761797304493084/cse/s0rxukow86o/gadget&amp;synd=open&amp;w=320&amp;h=75&amp;title=got+it&amp;border=%23ffffff%7C3px%2C1px+solid+%23999999&amp;output=js"></script>result like this

This code depends on the choice of language that we use for more details visit http://translate.google.com. TOOLS select the language there is the option, select the language which we use to create a blog or website for the code is different for each language. Sample code is a code over the choice of English For the modified file with the flag symbol, please copy the code below and paste to your blog's sidebar

<div class="widget-content">
<style>
.google_translate img {
filter:alpha(opacity=100);
-moz-opacity: 1.0;
opacity: 1.0;
border:0;
}
.google_translate:hover img {
filter:alpha(opacity=30);
-moz-opacity: 0.30;
opacity: 0.30;
border:0;
}
.google_translatextra:hover img {
filter:alpha(opacity=0.30);
-moz-opacity: 0.30;
opacity: 0.30;
border:0;
}
</style>


<center>
<a class="google_translate" href="#" target="_blank" rel="nofollow" title="English" onclick="window.open('https://translate.google.com/translate?u='+encodeURIComponent(location.href)+'&langpair=id%7Cen&hl=en'); return false;"><img alt="English" border="0" align="absbottom" title="English" height="32" src=" http://i41.tinypic.com/mcbs77.jpg" style="cursor: pointer; margin-right: 13px;" width="24"/></a>

<a class="google_translate" href="#" target="_blank" rel="nofollow" title="French" onclick="window.open('https://translate.google.com/translate?u='+encodeURIComponent(location.href)+'&langpair=id%7Cfr&hl=en'); return false;"><img alt="French" border="0" align="absbottom" title="French" height="32" src=" http://i42.tinypic.com/2qn39mr.jpg" style="cursor: pointer; margin-right: 13px;" width="24"/></a>

<a class="google_translate" href="#" target="_blank" rel="nofollow" title="German" onclick="window.open('https://translate.google.com/translate?u='+encodeURIComponent(location.href)+'&langpair=id%7Cde&hl=en'); return false;"><img alt="German" border="0" align="absbottom" title="German" height="32" src="http://i40.tinypic.com/2znvfxl.jpg" style="cursor: pointer; margin-right: 13px;" width="24"/></a>
<a class="google_translate" href="#" target="_blank" rel="nofollow" title="Spain" onclick="window.open('https://translate.google.com/translate?u='+encodeURIComponent(location.href)+'&langpair=id%7Ces&hl=en'); return false;"><img alt="Spain" border="0" align="absbottom" title="Spain" height="32" src=" http://i40.tinypic.com/15pse3p.jpg" style="cursor: pointer; margin-right: 13px;" width="24"/></a>

<a class="google_translate" href="#" target="_blank" rel="nofollow" title="Italian" onclick="window.open('https://translate.google.com/translate?u='+encodeURIComponent(location.href)+'&langpair=id%7Cit&hl=en'); return false;"><img alt="Italian" border="0" align="absbottom" title="Italian" height="32" src="http://i41.tinypic.com/v5c2eq.jpg" style="cursor: pointer; margin-right: 13px;" width="24"/></a>
<a class="google_translate" href="#" target="_blank" rel="nofollow" title="Dutch" onclick="window.open('https://translate.google.com/translate?u='+encodeURIComponent(location.href)+'&langpair=id%7Cnl&hl=en'); return false;"><img alt="Dutch" border="0" align="absbottom" title="Dutch" height="32" src="http://i42.tinypic.com/2qn39mr.jpg" style="cursor: pointer; margin-right: 13px;" width="24"/></a>
<a class="google_translate" href="#" target="_blank" rel="nofollow" title="Russian" onclick="window.open('https://translate.google.com/translate?u='+encodeURIComponent(location.href)+'&langpair=id%7Cru&hl=en'); return false;"><img alt="Russian" border="0" align="absbottom" title="Russian" height="32" src=" http://i41.tinypic.com/1ystb8.jpg" style="cursor: pointer; margin-right: 13px;" width="24"/></a>

<a class="google_translate" href="#" target="_blank" rel="nofollow" title="Portuguese" onclick="window.open('https://translate.google.com/translate?u='+encodeURIComponent(location.href)+'&langpair=id%7Cpt&hl=en'); return false;"><img alt="Portuguese" border="0" align="absbottom" title="Portuguese" height="32" src="http://i42.tinypic.com/2q1un43.jpg" style="cursor: pointer; margin-right: 13px;" width="24"/></a>
<a class="google_translate" href="#" target="_blank" rel="nofollow" title="Japanese" onclick="window.open('https://translate.google.com/translate?u='+encodeURIComponent(location.href)+'&langpair=id%7Cja&hl=en'); return false;"><img alt="Japanese" border="0" align="absbottom" title="Japanese" height="32" src="http://i39.tinypic.com/b3vu3t.jpg" style="cursor: pointer; margin-right: 13px;" width="24"/></a>
<a class="google_translate" href="#" target="_blank" rel="nofollow" title="Korean" onclick="window.open('https://translate.oogle.com/translate?u='+encodeURIComponent(location.href)+'&langpair=id%7Cko&hl=en'); return false;"><img alt="Korean" border="0" align="absbottom" title="Korean" height="32" src="http://i41.tinypic.com/wv7orr.jpg" style="cursor: pointer; margin-right: 13px;" width="24"/></a>
<a class="google_translate" href="#" target="_blank" rel="nofollow" title="Arabic" onclick="window.open('https://translate.google.com/translate?u='+encodeURIComponent(location.href)+'&langpair=id%7Car&hl=en'); return false;"><img alt="Arabic" border="0" align="absbottom" title="Arabic" height="32" src="http://i43.tinypic.com/2552exg.jpg" style="cursor: pointer; margin-right: 13px;" width="24"/></a>
<a class="google_translate" href="#" target="_blank" rel="nofollow" title="Chinese Simplified" onclick="window.open('https://translate.google.com/translate?u='+encodeURIComponent(location.href)+'&langpair=id%7Czh-CN&hl=en'); return false;"><img alt="Chinese Simplified" border="0" align="absbottom" title="Chinese Simplified" height="32" src="http://i42.tinypic.com/2pt7x9v.jpg" style="cursor: pointer; margin-right: 13px;" width="24"/></a>
<a href="#" target="_blank" rel="nofollow" title=" Install this widget " onclick="window.open('https://darmapala-40.blogspot.com/2009/06/translate-widget-icon-with-symbol-flag.html'); return false;"><img border="0" alt=" Install this widget " title=" Install this widget " align="absbottom"/></a>
</center>


result like this


This code represents 12 languages:

English, Francis, German, Spanish, Italian, Dutch, Russian, Portuguese, Japanese, Korean, Arabic, Chinese
Read More...

how to install a computer with a USB Flash Disk


Bagi yang belum tahu bahwa windows tidak menginstal perangkat lunak menggunakan CD tetapi hanya menggunakan USB FLASHDISK juga bisa dilakukan, bahkan instalasi lebih hemat waktu. Selain itu, kita juga tidak perlu direpotkan komputer lagi walaupun kita tidak punya cd drive. Bagi yang ingin tahu cara menginstalnya ikuti langkah-langkah di bawah ini:
Perhatian: komputer / laptop harus mendukung booting melalui USB.

Pertama adalah kebutuhan yang harus dipersiapkan:

1. USB_MultiBoot_10 Anda dapat mengunduh langsung ke http://www.ziddu.com 
2. Flash Disk dengan minimal 1GB
3. CD instalasi XP

Ada dua proses untuk digunakan dalam hal ini cara:

1. Format kabel Flashdisk dan instal CD Copy
2. Instal

Proses Komputer Pertama: Format Flashdisk

Jika peralatan yang sudah Anda siapkan, ikuti langkah-langkah ini:

1.Extsrak file yang Anda unduh
2.USB_Multiboot_10.cmd jalankan dan akan muncul sebagai gambar di bawah ini Tekan Enter Kemudian lagi opsi berikut muncul ketik H dan tekan enter. Lebih banyak gambar muncul di bawah, opsi Pilih NTFS File System


dan centang Quick Format dan tekan Start. Setelah pemformatan selesai, Anda dapat menutup Format Box Klik Kemudian muncul lagi di kotak menu CMD pilih no. 1 dan kemudian Masukkan Keterangan: 0> adalah untuk mengubah jenis driver, 1> adalah lokasi Sumber Pengaturan XP, 2> adalah USB flash lokasi Anda 3> adalah untuk memulai salinan instalasi xp ke USB Flash Anda pergi ke CD Anda drive Setelah Anda memilih sumber XP maka Anda akan muncul sebagai pilih NO BOX Contents UsrXP, SerialNumber, Computer Name, dan begitu hasilnya seperti ini dan klik Ya Klik OK Kotak CMD muncul lagi dan pilih no. 2 dan pergi ke drive USB Anda Kemudian pilih no. 3 untuk mulai menyalin CD Xp ke USB, tunggu sampai setelah


Pada pertengahan proses, kotak penyalinan akan muncul Pilih Ya pada kotak yang muncul pilihlah proses final TIDAK Salin selesai. Anda dapat menggunakan USB untuk Menginstal Windows Xp. Proses pertama selesai Proses kedua: Instal Komputer setelah itu Anda akan diatur sebagai windows normal 1. Pasang flash ke komputer / laptop, atur flash sebagai perangkat boot pertama di BIOS. 2. Pada saat booting Anda dapat menekan F8 atau DELETE, atau sesuai dengan pengaturan bios komputer Anda 3. maka pilihan akan muncul dg latar belakang biru 4. pilih Advanced Bios Features, saya tidak meletakkan menu kiri NO2 5. pilih pilih lalau Harddisk Boot Priority 6. ada nama hard drive Anda dan gunakan nama USB Flash Anda


7. Geser USB pada pesanan pertama Anda menggunakan Page UP
8. setelah Keluar dan Simpan
9. pada saat mem-boot komputer Anda dengan flash, ada beberapa opsi, pilih no 1 (Pengaturan Begin 1 TXT Mode Setup Windows XP) instal seperti biasa
10. Setelah restart pertama kali, Anda masih harus menjalankan boot, tetapi sekarang pilih "Lanjutkan ke XP SP2" atau "Lanjutkan ke XP SP2 dari 2nd Harddisk" jika Anda menginstal hard disk kedua, tunggu hingga restart kedua.
11. Setelah restart kedua, masih harus melakukan flash lagi melalui booting dan pilih "Lanjutkan ke XP SP2" atau "Lanjutkan ke XP SP2 dari 2nd Harddisk" jika Anda memasang hard disk kedua, tunggu sampai entri desktop.
12 Jika Anda masuk ke desktop, apakah flash aman dibatalkan.

CATATAN: Selalu BOOT DARI DAN JANGAN merilis FLASHDISK FLASHDISK UNTUK MENDAFTAR KE DESKTOP untuk pertama kalinya.

INFO: dalam instalasi harus hati-hati ketika Anda gagal kembali dari awal lagi, saya berhasil menginstal XP SP2 hanya dalam waktu 10-15 menit, bahkan kurang dari 10 menit
Read More...

Installation internet cafes (revisi part.1)

How to installation Internet Cafe’s

From experience, the feeling you want to know more, almost every day to search for solutions diinternet, on the tips and tricks about computer problems, all this happened because I did not have any knowledge at all about computer and internet network problems due to too anxious and this stupid peacock I always deceived with the computer engineers and alhamdulillah thanks to the internet cafes which have more than one year, I no longer use the experts. And now I can not tricked again, because I often learn about computers on the Internet and eventually bit by bit I can understand and comprehend. although no expert, but I can
Before we start the first we have to set the device for the computer cafe depends on the financial condition of each of us:

Example of a simple specification for the Public Internet Browsing:
In addition to Pc game

Device that is in need

Modem :
Modem is a device that is used as a PC or network to the Internet Service Provider (Internet Service Provider / ISP). Use The modem in this study is the type of ADSL modem. This type of modem usually used by ISP Telkomspeedy. For this type of ADSL modem itself can selected based on their needs. This time I take the example ADSL LynkSys AM 300, which only have 1 (one) as the only port dialup Device

Example :
Modem: Zyxel ADSL series (Tools Internet network to a PC)

Switch :
Is a tool that is used to share Internet connection from PC to PC server Client. Choice between the Hub / Switch / Router connection is determined by the ability of want to produce, and of course the match with the available funds. In the study our case this time I will use the Switch as a dealer internet connection

Example :
Switch: SMCF58 (tool dealer connection)

UTP cable: Straight Type
Connector: RJ-45
RJ-45 connector using the method
Straight. The order of the cord is:

RJ-45 connector using the method
Straight. The order of the cord is:
OP - O - HP - B - BP - H - CP - C
O = Orange; P = White, B = Blue; H = Green; C = Brown.

Note: In this method the second end of the cable connector to connect in a way that
exactly. Installation of the cable to the connector is done with the help of Tang for the Special LAN cabling
(Example of a simple specification for the Public Internet Browsing:
In addition to Pc plaything that can be asked in the computer shop special cable can be directly requested to install)

Lan Card: Brand depends on the needs, when using the USB cable modem lan card is not needed

Network: Speedy

PC Server:

Motherboard for a minimum of 2.0 Ghz Core 2 duo
Ram 1 Ghz
120 Gb hard disk partition divided 2 (drive C: system, drive D: Applications)
Drive: DVD / CD (Combo)
Etc. depending on the needs

Programs / Software:

Windows XP SP2 / SP3
Microsoft Office XP

Bandwidth Controller / Manager
Billing System, etc.
Anti Virus (AVG / Avira)
Anti Spyware, Malware, Adware

PC Client:

Motherboard For at least 1.6 Ghz Dual core
RAM: 512 MB
Harddisk: 40 GHz
VGA Card: on board

Programs / Software:

Windows XP SP2
Microsoft Office XP

Program for Browsing:

01. ACD See 7.0 (Edit Photo)
02. Adobe Reader (Readers tex)
03. Java (Show picture)
04. Internet Explorer (Browse)
05. Mozilla FireFox (Browsing)
06. Opera (Browsing)
07. Yahoo Messenger (message)
08. mIRC (message)
09. WinZip (Readers file)
10. WinRAR (Readers file)
11. Anti Virus (Free AVG / Avira free)
12. Winamp (Free)
13. Billing (rate)

The second phase

How to Connect a network cable:

Modem, Server, Switch, Client

Image installation internet cafes :

Before the move to the modem settings first installation of the modem needs to be done:
1. Cd entries follow the instructions (usually cassette cd is available in the modem box)
Before Cd earlier in the install make sure the usb cable modem and cable internet is connected through telephone network removed first.

2. After a new command to install the cable modem continues to follow the command pc

3. Then attach the new cable that is connected to the Internet through the telephone network, and check

Pictures Are Computers for Dial-Up Network Conection.klik in the right panel propertis On the General tab see box type the phone number No.8, 81.3 oke ago ago test Dial-Up (Open control panel click the network icon conection). back again to see the control panel icon click on ADSL

right open select setup and select check box if the code does a profile (PPPoE (LLC, VPI = 8, VCI = 35) is appropriate with the region where we live internet usually automatically after we to the modem settings through internet explorer (instructions are attached in the purchase of modem), if not click reinstall ago ok let computer restat

Note: usually the network for Speedy Modem installed by qualified telkom, the This provided a backup re-install the modem in the case of network interruption or damage to the modem

Modem Setting

to ensure that the PC server connected to the internet:
1) Open Internet Explorer and typing the following address: 192.168.1.1 (usually is default IP address for the modem).

2) When the login window appears fill in the username: admin Password: admin, or in accordance
with the user guide that is available at the time of purchase of Modem.

3) Fill in the appropriate figure in the picture below, except the user name and password each different in accordance with the obtained from the ISP.

4) Charging more is to allow DHCP Server enable / disable, Enable Option should be selected so that we no longer set a by one IP Client. Because this facility has a capacity for setting up IP
Client automatically.

5) For the Time Zone is done in accordance with the domicile you live. And to time server installation shown in the picture is that I instalasi recommend.
6) If we want to change the modem username & password are for us we need to do option on the following:

7) connection we can monitor our tabs on the status (picture), the IP addresses actually we listed at the bottom of the screen. I do not show the security reasons.

8) Once all the settings in step with the test that we can do is with us to open Internet Explorer, go to one of the WEB address diloading easy. Example: Http: / / www.google.co.id/ ago for testing speed can be done through some sites which provides measurements Bandwidth, for example: http://www.sijiwae.net/speedtest/


next page.....>>
Read More...

How to installation Internet Cafes (revisi part.2)

Synchronization

After the relationship between the PC server and internet connection can run smoothly step is the next synchronization. So that all computers can tersinkronisasi correctly, following are the steps that must be done:

1) Synchronize Computer Name / Name of the PC and the Work Group is done in a way

as follows:

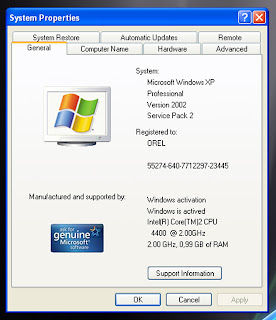
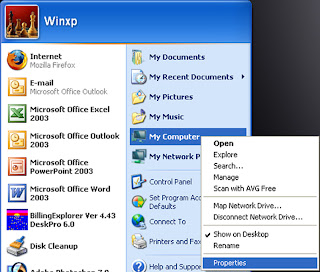
a. Showing Task Control System


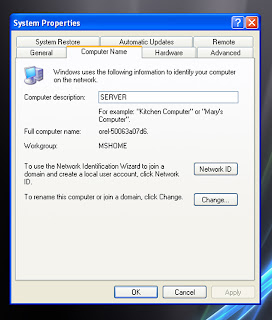
b. In the Computer Name tab click Change to change the name of the computer and workgroup name. Name of the computer should be sorted according to the number Clientnya easier for us to remember the name of each computer, name of each PC may not be the same. But for the workgroup name must be made is the same for all Client and Server.

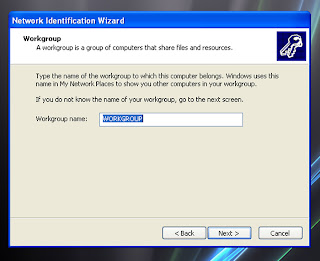
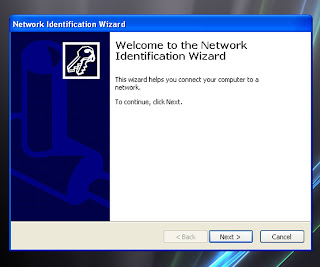
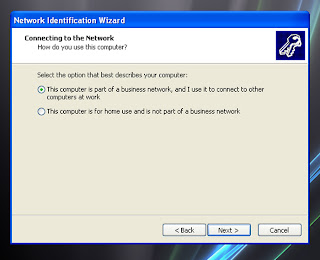
c. After we change the name of the PC the next step is to change Network ID with the Network ID tab click on the task before the Control System.

* On the question How Do You Use This Computer choose this option Computer is part of a business network, and then click Next.

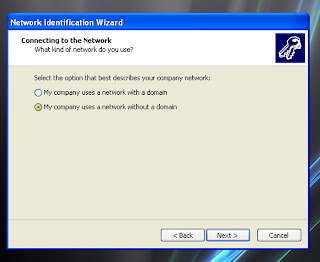
* Option on next choose the Network without a Domain.

* Then fill in the name according to the workgroup name WorkGorup we fill in the time to change the name of the PC in the step (b) earlier.


* Then Click Next and then Finish. Wait some time until the computer completes an alterative Network ID and do restrat Operating System / Reboot.

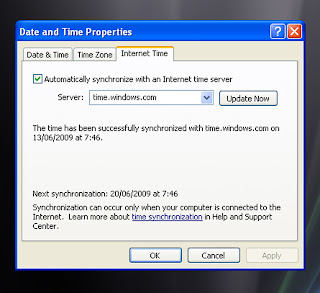
2) Time Synchronization / Time conducted through the following steps:

a. Double click the clock in the bottom left corner of your desktop.

b. Choose tabs = Internet Time> Update Now

c. Wait some time until there is a following statement: The time has ben succesfully Synchronized.

d. If the statement is an error to appear, then click Update Now repeat until successfully synchronize your PC time with the Windows server.

e. If the update was successful, but the clock shown is not the same, then the error
setting time zone:

installation is based on where we live, because different regions setiab time.

as an example: I take zones from Indonesia

GMT + 07.00 Bangkok, Hanoi, Jakarta, while for WITA is
GMT +08.00 Perth and WIT with 09.00 GMT + Seoul.

Internet Connection Sharing (ICS)

Up to this stage, the PC is connected keinternet hanyalan PC server only. To provide access for a PC client that has access to the internet we need to Internet Connection Sharing that we have on the PC server. The steps are

as follows:

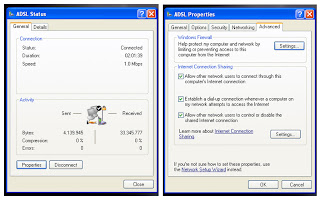
1) Open the Network Connection window in the Control Panel. Then right-click on our active connection to the internet => select Properties

2) In the Advanced tabs enable the option Allow other network users to connect through this computer's Internet Connection.

3) After a successful Internet connection sharing in the fruits will appear 2 kinds of connections. Should change the name of each connection in order to easily distinguish between connection that is connected to the modem connection that is connected to the Switch me-how to rename each connection

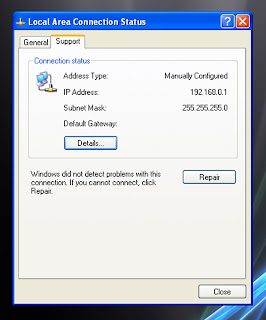
4) If we open the connection properties are connected to the Switch, the support tabs there is an IP address that will be the default gateway for the PC Client akan connected through a PC Server (192.168.0.1).

Network Setup

Mentioned only a step to give permission for the Client PC to be able to access the Internet. To enable permissions to the way it was set up Network / Network that we have. Step process is as follows:

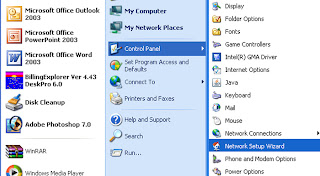
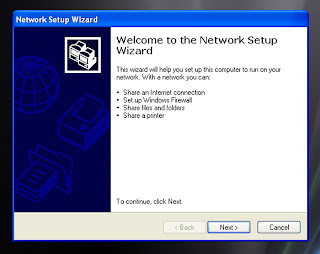
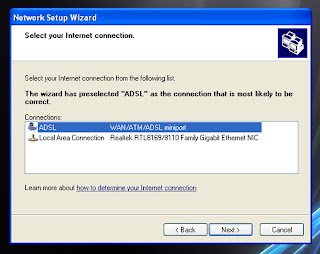
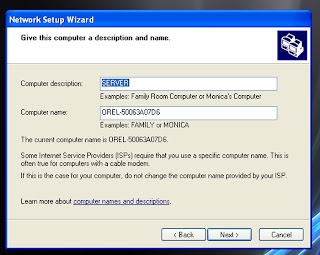
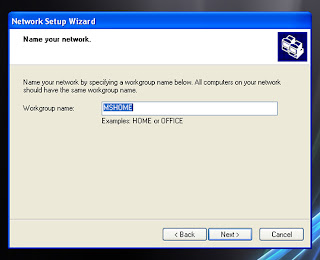
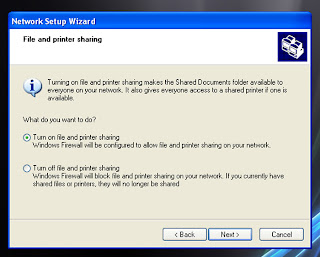
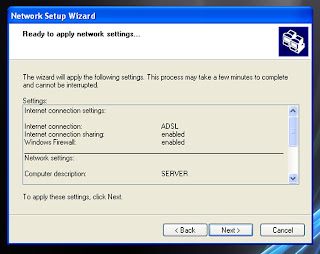
1) Open the Network Setup Wizard in the Control Panel. Then do the as in the picture. (make sure connection to the internet in a state of life).

Click Next

Click Next

Click Next

2) In the options select a Connection Method select the Connect Directly to the Internet for PC and server when installation do on the PC Client choose Option to Connect the internet through a residental gateway.

3) Option Next we determine the connection request, which we will use to make a dial-up to the Internet. Choose a connection that is connected to the modem. This option is not there at the time we do the settings in the PC Client

4) Fill in accordance with the Computer Name has a name that we gave earlier, and fill Computer Description if you want (Optional / not be no effect).

5) Fill in name according to the workgroup name that we specify. Need remind me again that the workgroup name should be the same for all computers so that the setting step easier.

6) Select the option Turn On File Sharing and Printing in the next task

7) After setting the log window right click on it we have to run / Enabling

8) Wait for some time to adjust the computer is finished with installation new.

9) Select the option just finish the wizard, click Next => Finish. Usually the PC will automatically


reboot after completing the procedure earlier. Step we do the same on all PC Client. Differences in how the settings between the PC Server and PC Client is located just on the point 2 and point 3.
After completing these steps installation do on the PC Client testing connection in the same way with the PC Server, which is the site address that is easy to Loading in and test the connection speed. When the connection is too slow it is please do check on installation Network earlier if there are any options or not, and also do checks on whether the correct cable connection yet.

Until this step is all the PC Client can be connected to the Internet for free Turn on the PC Server connection. To restrict the use of the PC Client is several options. The first is to make the list user's client computer, where the user have the right to access the internet which is not
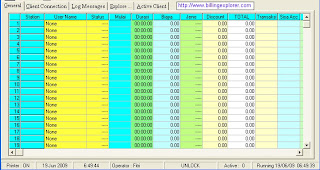
allowed to access them. installation are usually used in offices. While the cafe, access restrictions is usually done with the install program on the billing server and PC Client. Billing for the product in the country there are already some of the program www.billingexplorer.com
www.indobilling.com and are for the purpose of setting this please contact the distributor billing respectively. Here is an example view of the program issued by the Billing Explorer.


Hopefully this guide useful for all of us.


Read More...